Description
Your CopperCube has come from the factory in an unconfigured state. This document describes the steps that need to be done in order to set up your CopperCube so that it can collect data from your BACnet network.
The following steps can be taken to set up CopperCubes:
1: Physical Set-Up
- Connect 24VAC/50VA to the 2-pin screw terminal or 12-28VDC/30W through the barrel connector of a power supply to the CopperCube. If you did not order a power supply and require one, they are available through online ordering. Part numbers are 194300 (North America) and 194301 (European)
- Check the Power LED and if it is not on, press and hold the power button until the green power light turns on. When the CopperCube starts up, it will produce a short beep.
- Plug a Cat5e cable into your computer’s network port and then into and into the CopperCube fixed-IP Service port (labeled LAN 2). Please note that the CopperCubes purchased prior to March 1, 2014, has a different fixed-IP. Click FixedIP for more information.
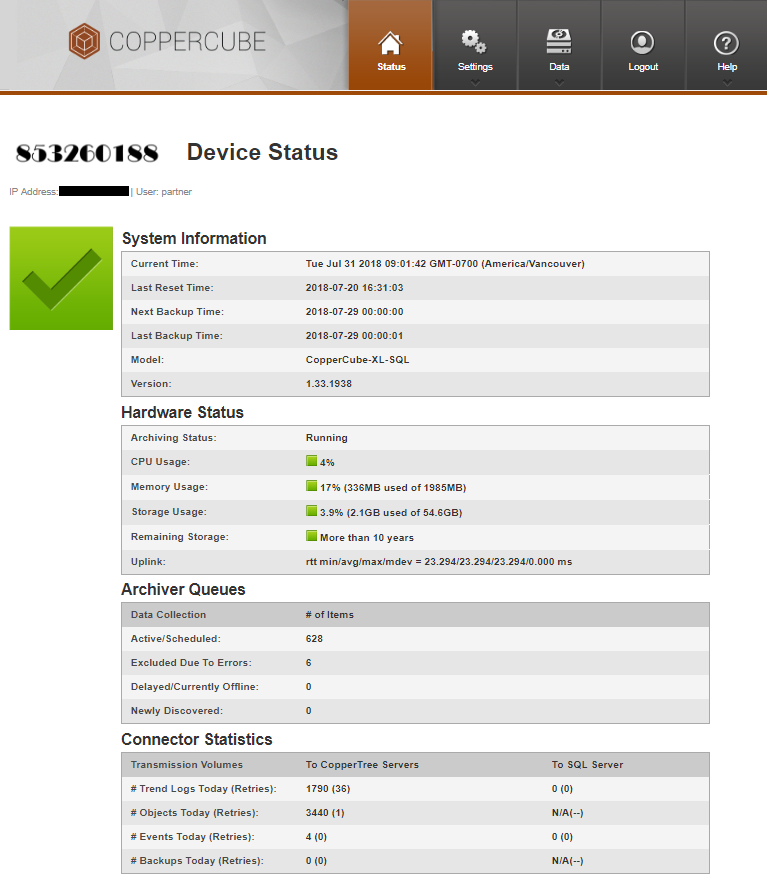
- Open a web browser and enter 169.254.8.29 into the address bar. If the setup is correct, you should see the status page of the CopperCube graphical user interface (UI).
Status page:
2: Log in
The CopperCube GUI requires the user to log in using a username and password. If you are logging into the CopperCube for the first time, see the image below for username and password.
Log in page:

You have to configure the CopperCube so that it can start sending data to the secure cloud. Below are the steps for configuring your CopperCube:
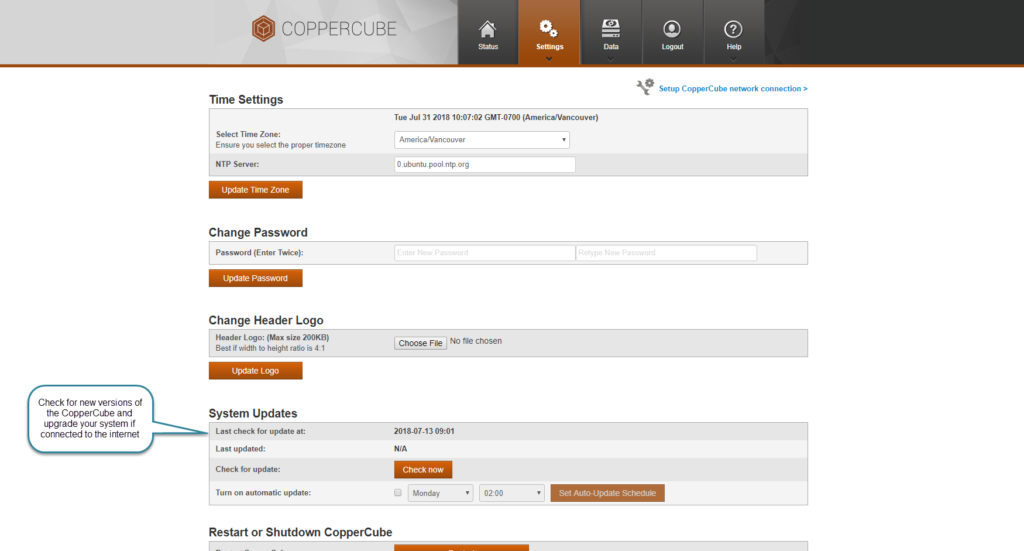
3: Basic Settings
Settings >> Basic Settings: The Basic Settings page is used to do some configuration of the CopperCube. The Time Zone and Header Logo settings are one that is recommended to be updated. If CopperCube is connected to the internet you can use the Automatic/Manual System Updates to check for the new CopperCube versions.
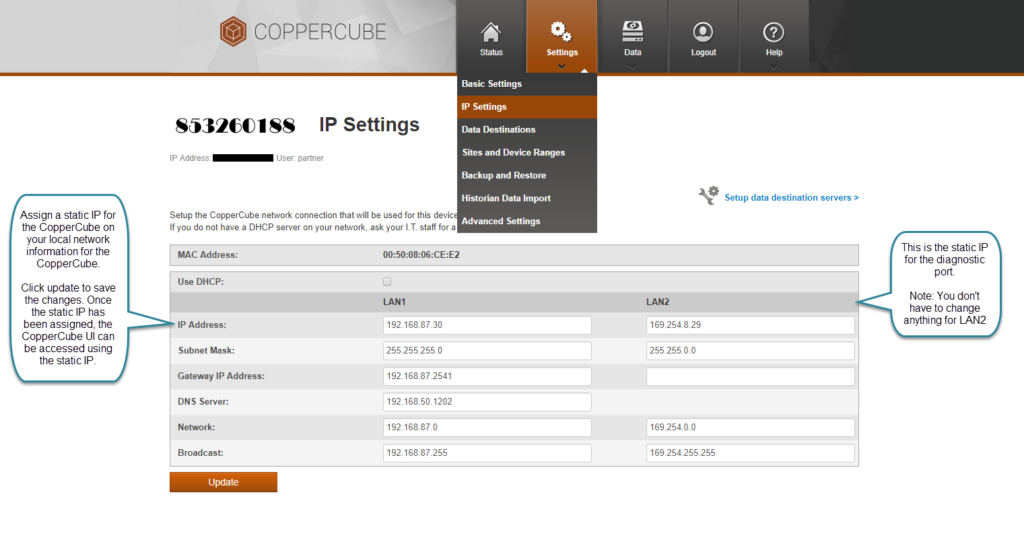
4: IP Settings
Settings >> IP Settings: The CopperCube comes pre-configured with two active Ethernet ports:
- LAN 1 – BACnet Port – can be configured by the user to have a dynamic IP address or a user-defined static IP address
- LAN 2 – Service Port – the IP address for this port is configured at the factory with a static IP address: 169.254.8.29 and cannot be changed. This address is part of the reserved ‘zero-configuration IP’ address range (169.254.x.x).
As the configuration of a CopperCube is done via a web browser, it is recommended to use a Static IP address for the BACnet port.
Follow the instructions at Set IP for information on how to configure these settings.
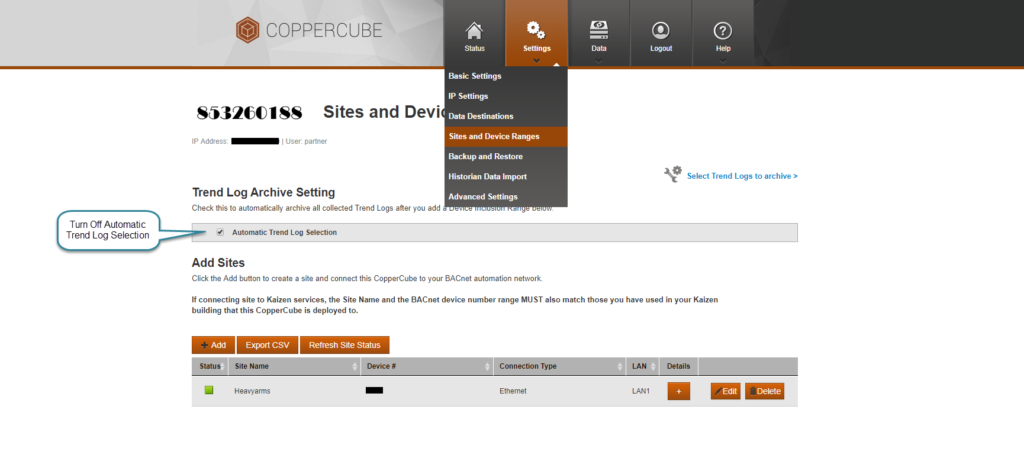
5: Add a site
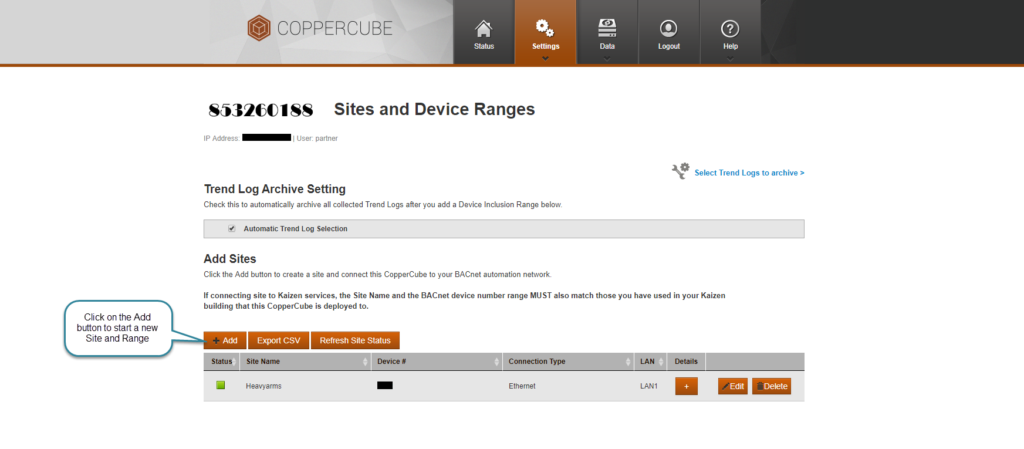
Settings >> Sites and Device Ranges: You must have the CopperCube connected by the BACnet port to the building control network to configure the Sites and Devices. The site provides a definition for the CopperCube software to be able to connect to the BACnet network and retrieve data.
See Sites for information on defining your site(s). This site name will also need to be entered into Kaizen so that your Kaizen account presents the correct data. This setup information is used to ensure that data from CopperCube is mapped to the correct building in Kaizen.
Turn Off Automatic Selection of All Trend Logs when the Automatic Trend Log Selection box is selected, CopperCube will automatically discover and archive all trend logs it finds on the site. However, in most cases, instead of allowing the system to choose all trend logs, you want to select specific trend logs to archive.
Even though the automatic selection is turned off, CopperCube will still continue to discover new trend logs on the site. These trend logs will be set to Not Archived by default.
6: Define a BACnet Site and Device Ranges
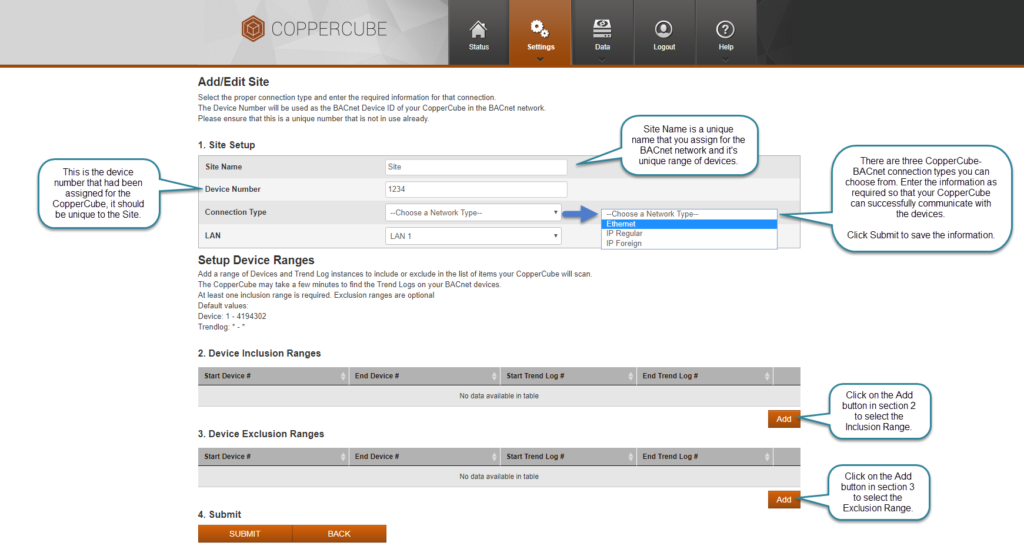
The trend log data is saved internally on the CopperCube. The data can also be moved to a Kaizen or SQL server. You can add multiple BACnet sites on the same CopperCube but each site has to have a unique connection to a BACnet network. You need to consider the following information before you add a site:
- The site name is a unique name on your CopperCube with a unique range of devices. The name should be kept as short as possible as this data is stored repeatedly in the database. When setting up a building in CopperTree Kaizen to receive the data from the CopperCube, this site name needs to be entered as an exact match. It is recommended to minimize spaces and extra capitals.
- You need to enter the connection type and device number for the CopperCube on the BACnet network. This device number must not conflict with any other device numbers in this BACnet network. If connecting to multiple sites, the device number does not need to be the same for every site but should be what works best for that particular site.
- You can only set up 1 site per BACnet network. Setting up multiple sites in a single BACnet network produces communication problems in the CopperCube.
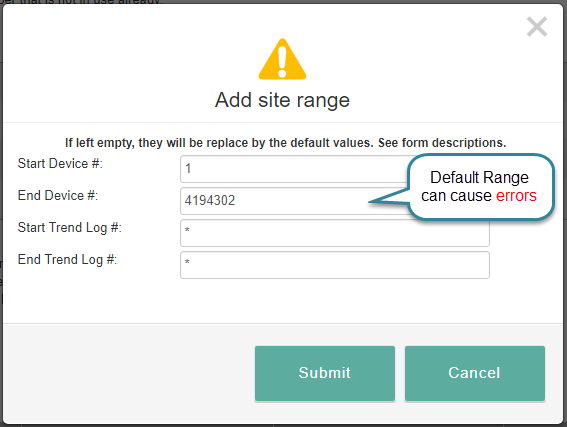
WARNING: If you select the Default Device range, it could cause errors if you’re close to your license size.
7: Select Specific Trend Logs to Archive
Note: It will take some time for all your trend logs to appear in the CopperCube GUI, depending on the size and speed of your site network.
At the top of the page, select Trend Log Management from the Data dropdown menu.
To select a single trend log, check the selection check-box in the same row as the trend log. To select all the trend logs on the results list, check the selection check-box next to the Archive Status column in the table. The CopperCube remembers which trend logs you’ve selected for future sessions.
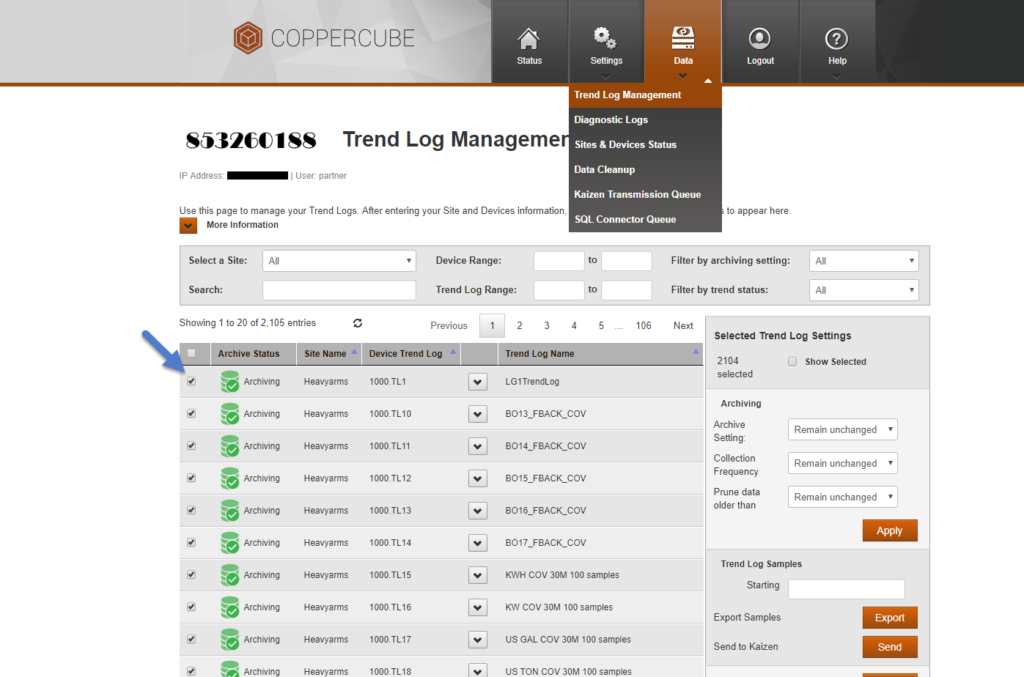
To determine how these selected trend logs are archived, in the Selected Trend Log Settings section, make the following changes:
- In the Archiver Setting field, select Archive.
- The default Collection Frequency of the trend logs is 4 hours. The CopperCube may naturally visit a trend log more often to avoid losing samples, so reducing the collection frequency should only be done when prompted by CopperCube Technical Support.
- In the Prune data older than the field, you can change the settings for the auto-pruning function by selecting an option from the drop-down list. By default, CopperCube models (except the KDP model) prune any data older than 5 years. The KDP model prunes data older than 2 months.
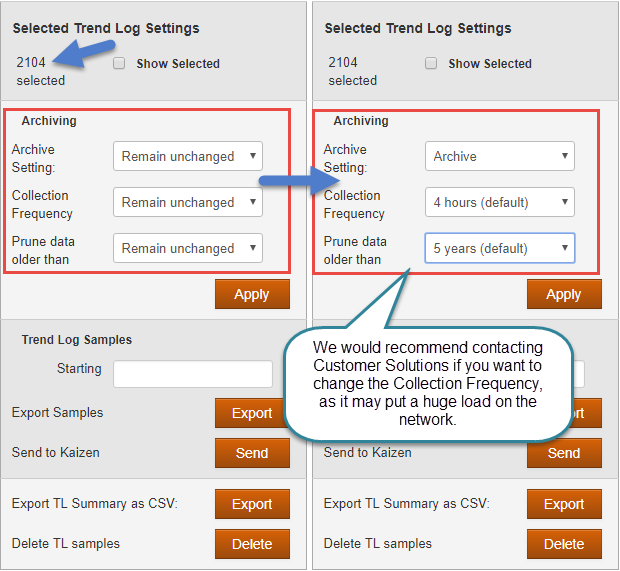
WARNING: Contact Customer Solutions if you want to change the Collection Frequency. You may put a huge load on the Network.
Click Apply. The page will be updated, and the CopperCube will start archiving.
8: Turn On Automatic Selection of All Trend Logs
When you are satisfied with the archiving performance of the initial setup, go back to the CopperCube GUI and turn on the Automatic Selection of All Trend Logs box.
This ensures future new trend logs that are defined by the device inclusion ranges are archived automatically.
Next Steps
Your CopperCube has now been configured to start collecting data from the BACnet network.
The next step is to configure the Kaizen server for your site. The Kaizen server is found here
