Description
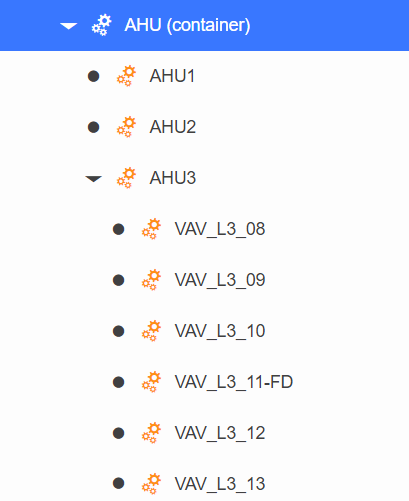
A System Hierarchy is a way of organizing Systems into groups and nests them within other Systems. For example, one might want to organize all VAVs to be ‘underneath’ the AHU that supplies them with air, or one might want to group all of the Chillers into one plant. A System Hierarchy allows quick navigation and easy comparison of results between Systems.
Please note that these steps assume that there are already Systems created within your building. If you have not yet created any Systems, see here for information on Autodiscovery, or here for information on manually setting up Systems.
Best Practices
Below are recommended guidelines for organizing your system tree. Not all methods will be useful for your building, and not every level may apply, but the end goal should always be to logically organize your systems into minimally sized groupings that are meaningful to you and your organization.
This will provide you with a top-down approach to gain perspective into your building. You may have multiple trees with the same Systems to provide different perspectives of the same information. No grouping in the system tree should contain more than approximately 15 items.
System Type Grouping
This should be feasible regardless of available information from the building as a lot of it will be based on naming conventions.
- Grouping by system type
- New Systems should be created as containers for the existing Systems.
- Examples:
- AHUs
- Boilers
- Chillers
- VAVs
- Fan Coils.
- Recommend further refining child groups by nomenclature
- Examples:
- If AHU has 60 VAVs, divide them up into 4 groups of 15
- VAVs (1-15, 16-30, 31-45, 46-60).
- Examples:
System Relationship Grouping
This would require knowledge of the building’s programming, although there may be some clues in the system naming convention.
- Create known parent-child relationships
- Examples:
- VAVs 1-30 are served by this AHU
- Pump X is served by Chiller 1.
- Examples:
- Repeat the child-parent relationship for as many levels as applicable for your systems
- Recommend further refining child groups by nomenclature
- Examples:
- Rooms 100-115
- ERs 1-10
- Offices 15-30.
- Examples:
Location-based grouping
This would require knowledge of the building, although there may be some clues in the system naming convention.
- General Location
- New Systems should be created as containers for the existing Systems.
- Examples:
- North wing
- First floor.
- Recommend further refining child groups by nomenclature
- Examples:
- Rooms 100-115
- ERs 1-10
- Offices 15-30.
- Examples:
Use based grouping
This would require some knowledge of the building as well as the organizations that occupy it.
- Criticality
- New Systems should be created as containers for the existing Systems.
- Examples:
- High
- Medium
- Low.
- Room types
- Examples:
- CEO office (high)
- ERs(high)
- Server Rooms(high)
- Classrooms(medium)
- Common Spaces (low).
- Examples:
- Recommend further refining child groups by nomenclature
- Examples:
- Rooms 100-115
- ERs 1-10
- Offices 15-30.
- Examples:
Procedure
Navigate to ![]() Systems to begin. The Systems icon is located by first clicking a building in the navigation panel on the left, and selecting the icon, near the top-right. You should see the Systems you have created.
Systems to begin. The Systems icon is located by first clicking a building in the navigation panel on the left, and selecting the icon, near the top-right. You should see the Systems you have created.
Adding a new System Hierarchy
The following steps detail how a new system hierarchy is added:
- Create a new System by selecting the
 button. This new System will be the higher group name and can contain Trend Logs as well as other Systems (such as when VAVs are grouped under an AHU). Provide a name and description for the System.
 - Provide any System tags that may be necessary. For example, AHU, VAV, Plant, etc.
- Click the next to “Subordinates”.
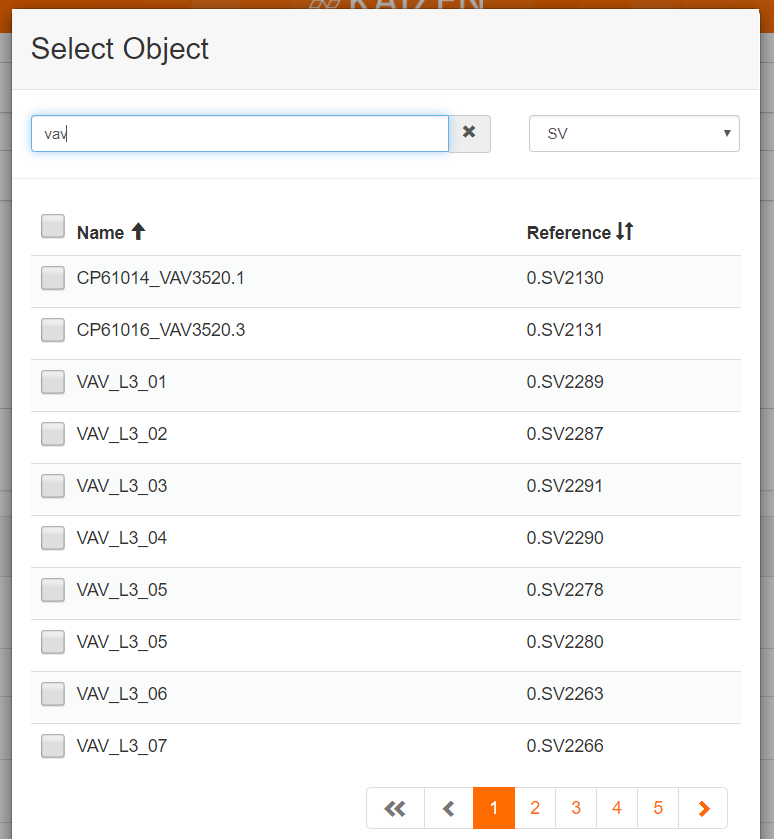
- A dialog box will appear with the building’s objects listed. Change the drop-down list on the top right (originally saying “All Types”) to SV. The Systems existing in your building should be listed as objects, underneath the Name column
- SV stands for Structured View and may contain other objects aside from your Systems
- Select the Systems you wish to include in your System Hierarchy by checking the grey box. You can use Search to narrow results.
- If desired, add additional Trend Logs and rules as one would when manually setting up a System (see Manual Setup).
- Click
 Submit to save the System.
 - On the left panel, the Systems defined by the SV objects should be contained within the newly created System.
Editing an existing System to create a Hierarchy
The following steps detail how an existing system can be edited to create a hierarchy:
- Edit a System by clicking its name on the Systems page.
- Click the next to “Subordinates”.
- A dialog box will appear, with the building’s objects listed. Change the drop-down list on the top right (originally saying “All Types”) to SV. The Systems existing in your building should be listed as objects, underneath the Name> column
- SV stands for Structured View and may represent other objects aside from your Systems
- Select the Systems you wish to include in your System Hierarchy by checking the grey box. You can use Search to narrow results.
- Click Submit to save the System.
- On the left panel, the Systems defined by the SV objects should be contained within the newly created System. Edit a System by clicking its name on the Systems page.
- Click the next to “Subordinates”.
- A dialog box will appear, with the building’s objects listed. Change the drop-down list on the top right (originally saying “All Types”) to SV. The Systems existing in your building should be listed as objects, underneath the Name> column
- SV stands for Structured View and may represent other objects aside from your Systems
- Select the Systems you wish to include in your System Hierarchy by checking the grey box. You can use Search to narrow results.
- Click Submit to save the System.
- On the left panel, the Systems defined by the SV objects should be contained within the newly created System.
